

The first project I made this year was a pinch pot made with red earthenware clay. I didn’t want my pot to look like the others in class so I decided to make the silhouette of the pot square and carve a small design on the sides. I fired the vessel and glazed it with light green glaze. The second piece I made, also using red clay, definitely shows my improvement in the class. I also used the pinching technique when creating this vessel, but this time I made the vessel much bigger to prevent the clay from drying to quickly and cracking. Around this time we were learning about the different parts of a vessel and I wanted to manipulate the lip to make the form more dramatic. The began to take the shape of a petal and I decided to create a flower pot shaped as a flower. You can see I have more control in creating this vessel by the smoothness of the form and the way I added extra clay to come off the form. My glazing had improved as well, even though the red clay still shown through in some spots it was much thicker on this piece.

I used a coiling technique to design my third vessel. This was a motor and pestle for my mother because she always complained that her wooden one wasn’t good enough. For this project I went with the thought less is more, because this vessel actually has a working purpose I knew I wanted to keep the form simple and chic and bring my own unique style in embellishing the form with the Celtic grooves on the sides. This time my glaze really turned out well and covered the whole form. I chose the color based off of the red theme already integrated in the kitchen at home. My fourth vessel was done when we just learned scraffito. I used red earthenware clay and constructed the form using slab building. I was really excited to use scraffito because the technique is very similar to the one used when working with scratch board and I had just finished a twelve piece scratch board collection in art class. This was made in October and I really wanted to give off the Halloween vibe so I chose to use black under-glaze to really contrast against the orange the clay turns after firing. I’m in love with how the piece turned out and how the carving out the moon really gave off the vibe that everything else was cast in shadows.


My fifth piece I had more freedom in terms of what I could design. I really wanted to go a more artistic and abstract route this time. I wanted to make a piece someone with a big pay check could hang on their wall and it would look like it belonged their. I used slab building for the construction of the entire piece. This piece was the most difficult because no one was really sure of how to make the waves as thin as I wanted them on the form. I remember looking at the rolling pin and just wishing it was smaller. Then I had the idea of using on of my fine art pens as my own tiny ruler. I created slabs and cut them into tiny ribbons and then I used the pen to thin out the tips of the ribbon to really make them look delicate. I chose to leave the other end of the ribbon thicker to form a more sturdy base so that it would stay attached throughout the whole process.
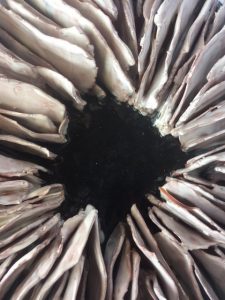
If I had to re-due a piece it would have to be the fifth piece I presented. The red earthenware stood out more than I would have liked and I know that I would have gotten a much better result had I used white earthenware clay. I also realized that if I had dipped the ribbons in white under-glaze before attaching them to the base I would have gotten a much more even look in the end. Also in my first version I had made the base square and then cut it after placing the ribbons on to make it round. This made me loose a lot of the clean sharp detail I had achieved with the pen.