Final

Vessel 1
Vessel 2

The first project I made this year was a pinch pot made with red earthenware clay. I didn’t want my pot to look like the others in class so I decided to make the silhouette of the pot square and carve a small design on the sides. I fired the vessel and glazed it with light green glaze. The second piece I made, also using red clay, definitely shows my improvement in the class. I also used the pinching technique when creating this vessel, but this time I made the vessel much bigger to prevent the clay from drying to quickly and cracking. Around this time we were learning about the different parts of a vessel and I wanted to manipulate the lip to make the form more dramatic. The began to take the shape of a petal and I decided to create a flower pot shaped as a flower. You can see I have more control in creating this vessel by the smoothness of the form and the way I added extra clay to come off the form. My glazing had improved as well, even though the red clay still shown through in some spots it was much thicker on this piece.

Vessel 3

I used a coiling technique to design my third vessel. This was a motor and pestle for my mother because she always complained that her wooden one wasn’t good enough. For this project I went with the thought less is more, because this vessel actually has a working purpose I knew I wanted to keep the form simple and chic and bring my own unique style in embellishing the form with the Celtic grooves on the sides. This time my glaze really turned out well and covered the whole form. I chose the color based off of the red theme already integrated in the kitchen at home. My fourth vessel was done when we just learned scraffito. I used red earthenware clay and constructed the form using slab building. I was really excited to use scraffito because the technique is very similar to the one used when working with scratch board and I had just finished a twelve piece scratch board collection in art class. This was made in October and I really wanted to give off the Halloween vibe so I chose to use black under-glaze to really contrast against the orange the clay turns after firing. I’m in love with how the piece turned out and how the carving out the moon really gave off the vibe that everything else was cast in shadows.

Vessel 4
Vessel 5

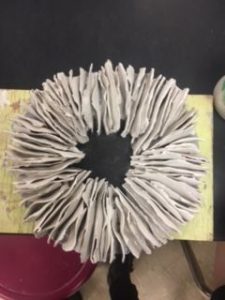
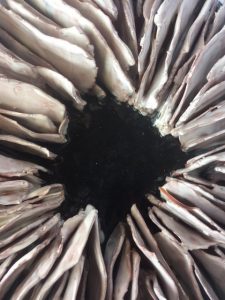
My fifth piece I had more freedom in terms of what I could design. I really wanted to go a more artistic and abstract route this time. I wanted to make a piece someone with a big pay check could hang on their wall and it would look like it belonged their. I used slab building for the construction of the entire piece. This piece was the most difficult because no one was really sure of how to make the waves as thin as I wanted them on the form. I remember looking at the rolling pin and just wishing it was smaller. Then I had the idea of using on of my fine art pens as my own tiny ruler. I created slabs and cut them into tiny ribbons and then I used the pen to thin out the tips of the ribbon to really make them look delicate. I chose to leave the other end of the ribbon thicker to form a more sturdy base so that it would stay attached throughout the whole process.
Vessel 5

If I had to re-due a piece it would have to be the fifth piece I presented. The red earthenware stood out more than I would have liked and I know that I would have gotten a much better result had I used white earthenware clay. I also realized that if I had dipped the ribbons in white under-glaze before attaching them to the base I would have gotten a much more even look in the end. Also in my first version I had made the base square and then cut it after placing the ribbons on to make it round. This made me loose a lot of the clean sharp detail I had achieved with the pen.

Blog # 10

In one of my last posts I wrote about how I wanted to start creating work that means something to me. I decided to pick the Identity Project as an opportunity to do so. I want to communicate the feeling of what it is like when I don’t take my medication for the day. I want to bring the feeling of confusion and constant motion which is how I would feel.

The way I am going to communicate this feeling is by creating the form of a bust and head and cover the head with tightly fitted together disks that when put all together create a sense of movement throughout the piece. The movement will be a spiral that starts from the center of the forehead and spreads outward. I’m going to use a skill i learned during the up close project to help me complete this new one by using the same technique of attaching the lines to attach the scales.

I have been heavily inspired by Fenella Elms in the past and continue to be. A new artist that has inspired me for this project is Emil Alzamora. More specifically his piece Mother and Child is what really inspired my idea for this piece.

Blog 9

Title: Iris in the Sky

The sculpture that I have made is abstract. The piece is round and has a circle of wavy lines sticking out of a slab and stopping short of the middle to make a circle out of the negative space. The slab is black and the lines are white to create contrast. The elements of line and color are the most important parts of the artwork.

My piece is organized by the principles of movement and pattern. When you look at the white lines that stand up from the slab you will see that they are not straight perfect lines. I made them thin and wavy to give the piece a sense that the piece has movement within itself. This also creates a pattern as I repeated the lines across the whole piece.

The artwork is supposed to convey the same feeling I felt when looking at the total solar eclipse. When I was looking at the sky it felt like something was looking back. I used the colors black and white to give off the feeling that this isn’t a normal eye. This is why I also made the piece look abstract up close but more like an eye from far away. I knew that this piece would be perfect for ‘Up Close” project because the impact the distance has on my piece is crucial to the meaning of the piece.

I believe that my piece is successful in communicating the theme of the project and I believe that the design of the piece is successful. I wanted to begin making artwork that has a meaning that connects more to myself and how I see the world and my piece does just that. The only thing I would change would be the size. I think if I could have made the piece a little bigger the meaning would have been even more clear.

Blog 8

 Project from blog seven

After looking at my previous posts I have discovered that I am an artist that likes to take risks. After reading my past blogs I came across many posts where talked about starting projects that were more advanced than my level of skill but continuing with the work anyways. One example is how, in blog post 5, I described my work as being too ambitious. I was worried that the project wasn’t going to work well, but I persisted with the project. Another example is the new project I wrote about in Blog 7. I had no idea how to create art work that was that thin and had never attempted a project like that before. Instead of changing my idea for an easier project I began experimenting with slabs. Eventually I found a way to create my art as thin as I needed. If I would have changed my project idea I would never have reached my full artist potential. An artist needs to take risks in order to gain skill level. I am also very skilled at creating original art even when I take inspiration from others. For example in Blog 5 my pitcher idea came from an  old art piece I had drawn a long time ago. I took the idea of that artwork and turned it into a 3-D project. The project I’m working on now is heavily inspired by Fenella Elms, but instead of copying her work I am changing certain aspects to make the piece my own

 Fenella Elms

 The picture I made that inspired my pitcher project

An art making skill I would like to improve upon is communicating through my work. So far I have created art works purely for the aesthetic effect. As an artist I know that having a message to convey through art is important. I have important messages to convey in my art and I would like to start focusing on artwork that holds meaning. I think that once I start conveying messages through my art I will develop a style that is my own and can be recognized by others.

Blog Post 7


Finella Elms work with patterns and edges in her pottery really inspired my work. As I was looking through her work I found a picture of a shell pattern she made. The fine lines and detail fascinated me. As I studied the shell piece I had the idea of creating and eye or the iris of an eye using that technique. When I am drawing it is very difficult to draw the details of the eye and I wanted to see if working with clay would be any easier.

My artwork will convey the theme Up-Close by playing with the idea of having one art piece look complete different from how far away you stand. From a distance you will be able to fully see the iris from where you stand. As you approach the work the iris shape will fall away until you end up looking at a circular abstract piece made by the lines that create the detail of the iris. 

Blog 6

The portrait activity helped me improve sculpting on such a small scale. For example adding the eyelids to the eyes and smoothing them out to look natural was very difficult. I also think that it shows how much I have improved my pinching skills because my head is the smoothest form I have ever pinched.

I really like the idea of art that looks abstact but once you move closer you can see that it actually has a form. I would like to try and make an eye out of relief tiles using the same type of style Fenelle Elms uses. I am not set on this idea though because i am worried about time and might have to change my idea.

Blog 5

I came up with the idea for the shape of my tableware from an old drawing I made last year. It was a picture of two ladies who’s hats became water fountains. After making that drawing I had always wanted to see what it would look like in 3-D. I got the inspiration for the design when I was browsing Pinterest. I was looking at different types of statues and fell in love with how the human form looked as a statue.

As you can see from my picture the face is too wide. I realize now that I need to make the neck more oval instead of circular. I’m slowly trying to cut away the wide parts of the neck and slim it down. I had a very difficult time building the face. At first I tried coil building it but finally Ms. A showed me a video of form building and how I could use a soft slab. Once I used the soft slab things became much easier.

This project has become almost a little to ambitious for me. I wasn’t sure how I was even going to build the form but in art you never learn until you try. The form doesn’t look exactly like what I pictured. Even though I’m not finished with it yet I am pleased that I went forth with my idea instead of choosing something simpler and easy.

Blog Post 4

I have a lot to improve on in both my utilitarian form and my slab project. For my utilitarian form I ran into a familiar problem. The glaze still hasn’t worked the way I would like it to on my pots. It looks to patchy and messier than I wanted it to look. For my slab project I would like to improve on my sgraffito decoration. During the sgraffito process some of the scraps from the person across from me went underneath my pot without my knowledge. This resulted in what the mess you see in the picture below, the scraps embedded  themselves into the back of the piece so deep I could not remove them.

The design on my utilitarian form worked exactly how I wanted it to with the lines being clean and even. If I were to rebuild my piece I would use soft slab building instead of coiling to achieve a cleaner wall and a flatter lip. I still have not improved in glazing. If I could re-due this piece I would love to see how it would look with a cleaner glazing job. I would definitely use only one color instead of two.

By sharing artwork the community becomes more inspired and creative. Someone once said that originality is dead, everything that can be done has been done. By sharing artwork, artists see how other people approached a familiar concept in a unique way. The more content that is shared the more ideas are generated letting the quality and the quantity of the community expand. It can also become a source of inspiration in the sense that looking at well crafted pottery can inspire new determination in someone to get better at their craft.

Slab building

Last week I began to practice a new method of sculpting clay by using slabs. I chose to make a soft slab pot which has a cylinder shape. First I had to make the slab I would be using by flattening out a tube of plastic clay. This was my favorite part because the circular motion you make, first by pushing the clay away from your body then pulling it towards you as you throw it on the table, felt very relaxing to me. I did not need to use the slab roller because my slab was thin enough. I wrapped a tube in newspaper then wrapped my slab around that. Using slip I fastened the connection until make my slab into a tube. Then I used the remainder of my clay to carve out a bottom and using slip I connected the bottom to my form.

This new form of sculpting has definitely increased my skills. This technique allows me to create a cylinder shape with sharp edges. This is something I couldn’t do before. I wish I had learned this technique during my utilitarian form because I could have sharpened the corners of my lip more. This new form of sculpting has also made become more familiar with how slip works. Before this practice I rarely ever used slip.